Why Implement a Headless CMS?
Are you tired of the inflexibility of a monolithic CMS? Are you duplicating your content from one digital platform to another to accommodate customers? Are you planning to switch from a project-based approach to a product-based approach?
If you answered yes to any of the questions, then a headless architecture could be the answer to your pain points.
As a refresher, a headless CMS (or decoupled CMS) separates the content from the presentation layer of a website application. The architecture provides users with a centralized approach by unifying content in one place, making it easier to create, manage, and publish.
So how do you get started? We created a detailed CMS migration checklist to walk you through the implementation process, ensuring a seamless migration from a monolithic CMS to a headless CMS.
Headless CMS Checklist
Here are the steps to follow for properly implementing a headless CMS:
Choose Your Frontend Framework
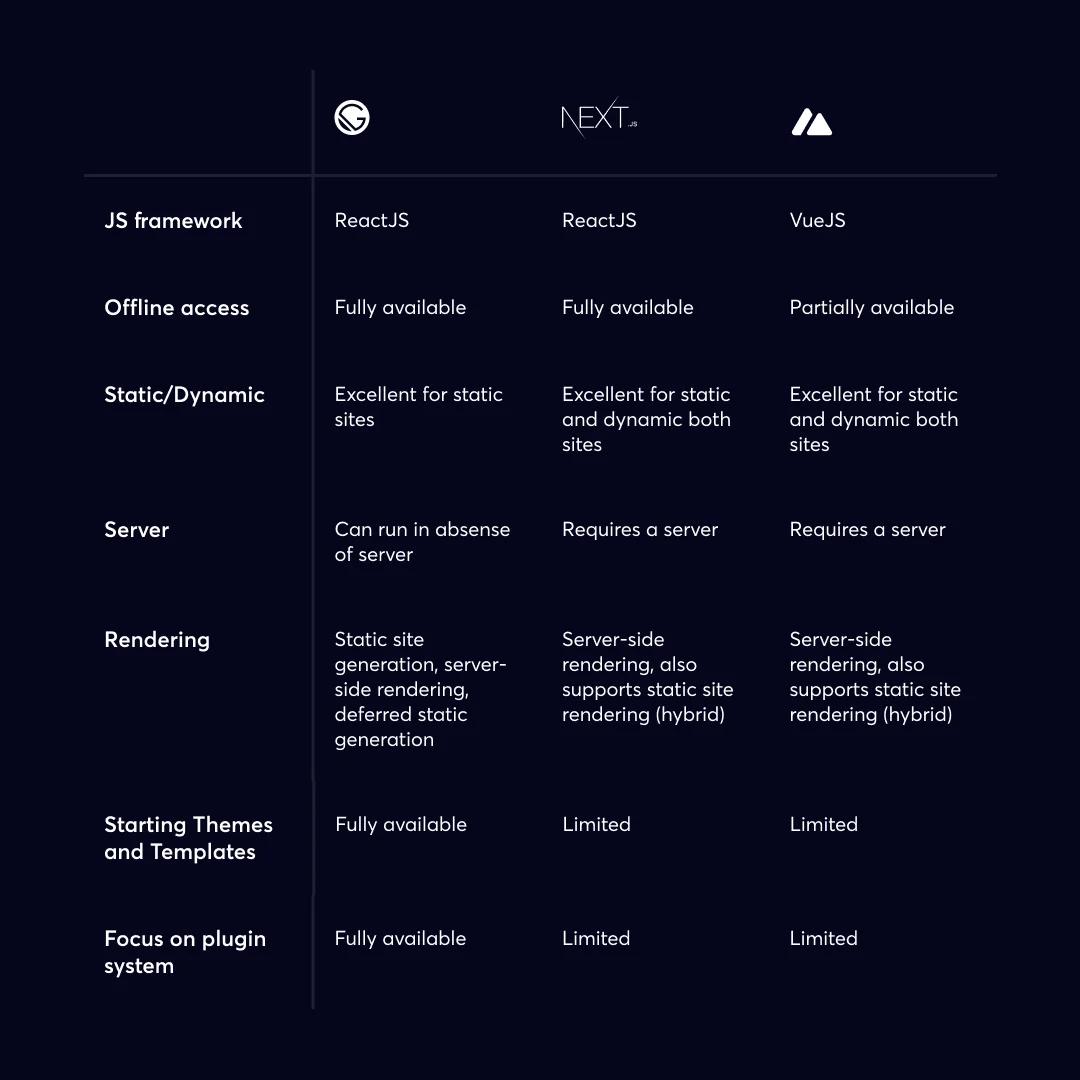
Choosing your frontend framework is crucial. We advise researching frameworks and aligning with stakeholders and teams that will use the CMS to understand business requirements and goals.
Headless-implementation-1
Common frontend frameworks that come to mind include:
- Gatsby.js
- Next.js
- Nuxt.js
Start the Technical Setup
Automate end-to-end deployments with continuous integration and continuous deployment (CI/CD). Here are the steps to create a CI/CD environment:
- Create a repository in any source control management system (Github, Bitbucket, etc) for your new website to host the source code
- For continuous integration, integrate the above-created website with your deployment platform (AWS, Gatsby cloud, etc)
- Integrate your CMS. (With this, any change in your CMS will trigger an automated build process)
Set User Roles and Permissions
Setting user roles and permissions is a crucial step in the implementation process. Your team will grant specific permissions to different users based on different roles.
This step involves creating custom roles for your CMS and defining the permissions that come with each role established. To achieve security and successful implementation, it is advised to give a minimum set of permissions to users specific to their role.
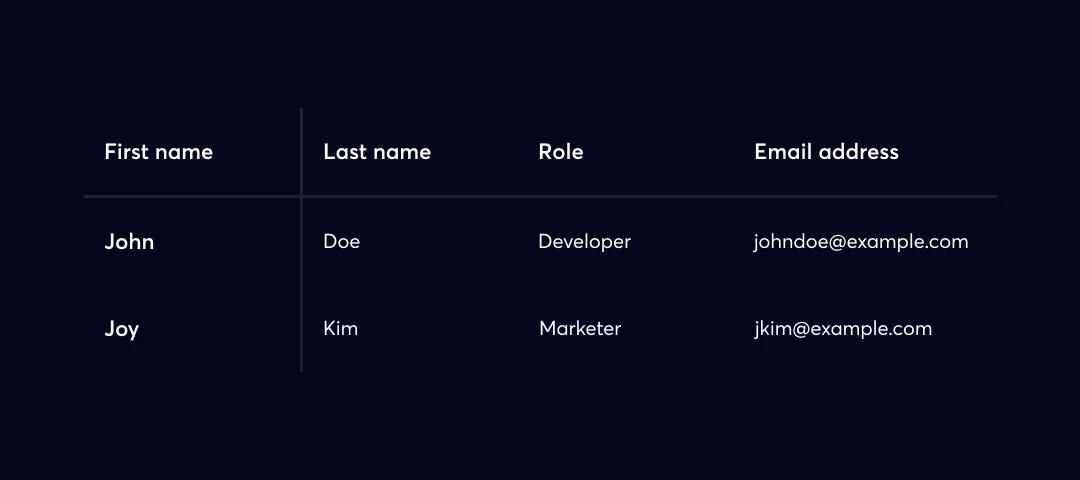
Headless-implementation-2
1. Create a table to organize the user information you have worked out (users’ first name, last name, role, and email address).
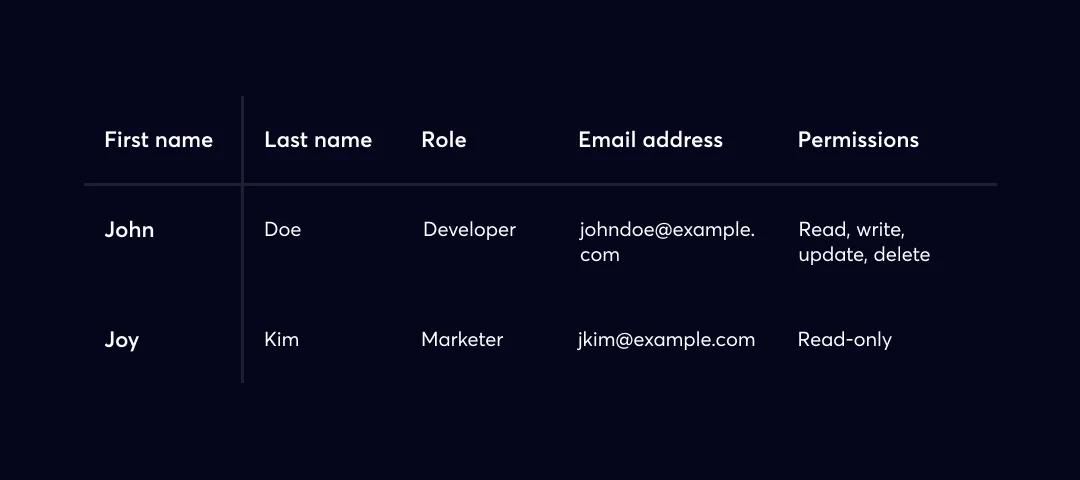
Headless-implementation-3
2. Now that you have information about users, create custom roles that fulfill the permission/access requirements of users.
What to Do After the Technical Setup
We’ve made significant progress by choosing a frontend framework, finalizing the initial technical setup, and setting user roles and permissions.
Next, you’ll turn your focus to your existing website.
Run a Website Crawl
Whether you're migrating to a traditional content management system or a headless CMS, it is important to run a website crawl during your site migration. The purpose of this step is to maintain the URL structure of your website and SEO metadata.
What is a website crawler?
The purpose of a website crawler is to index the content of your website. Web crawlers are typically managed by search engines (common examples include Google or Bing). They are simple computer programs that scan, observe, and understand the structure of a website.
At this step, you need to do the following:
- Run a website crawler on your website (for instance Screaming Frog)
- Document your findings/results.
- Provide your team with the results and ensure they maintain the URL structure and SEO metadata.
List Your Website’s Reusable Visual Components
These visual components will become the building blocks of your website pages. Establishing reusable visual components is essential in measuring the success of your headless implementation.
Visual content blocks must empower content editors to build, test, and optimize without engineering resources.
It is advised to document the slight variations of similar components on your webpage.
Here is an example of a list of visual components:
- Header
- Body
- Hero
- Sidebar
- Scrollbar
- Footer
Document All the Content Types
It’s important to document the current content types used on your website, including any future content types your team thinks they’ll use. Documenting all the content types gives you an overview of what you want to achieve and helps you decide how you want to present your content.
What are website content types?
A content type is the most important building block for a brand, digital ecosystem, or content management system.
Content types separate content into various types based on similar structure or purpose. This makes them reusable and introduces content consistency, scalability, and efficient content creation and entry.
Content types:
- Website pages - core website pages
- Blog posts - quick and easy reads, often written in the first person
- Press release - newsworthy information
- Webinar - a virtual event with an online audience
- Podcast - digital audio files (usually an episodic series)
- Ebooks - similar to a slideshow where users can control the speed with which they want to view information
- Guides - consists of guidelines/help
Establish a Naming Convention
Things can get out of hand is there no naming convention. Establishing nomenclature early on will keep the CMS clean and consistent.
An example of a naming convention for a content model:
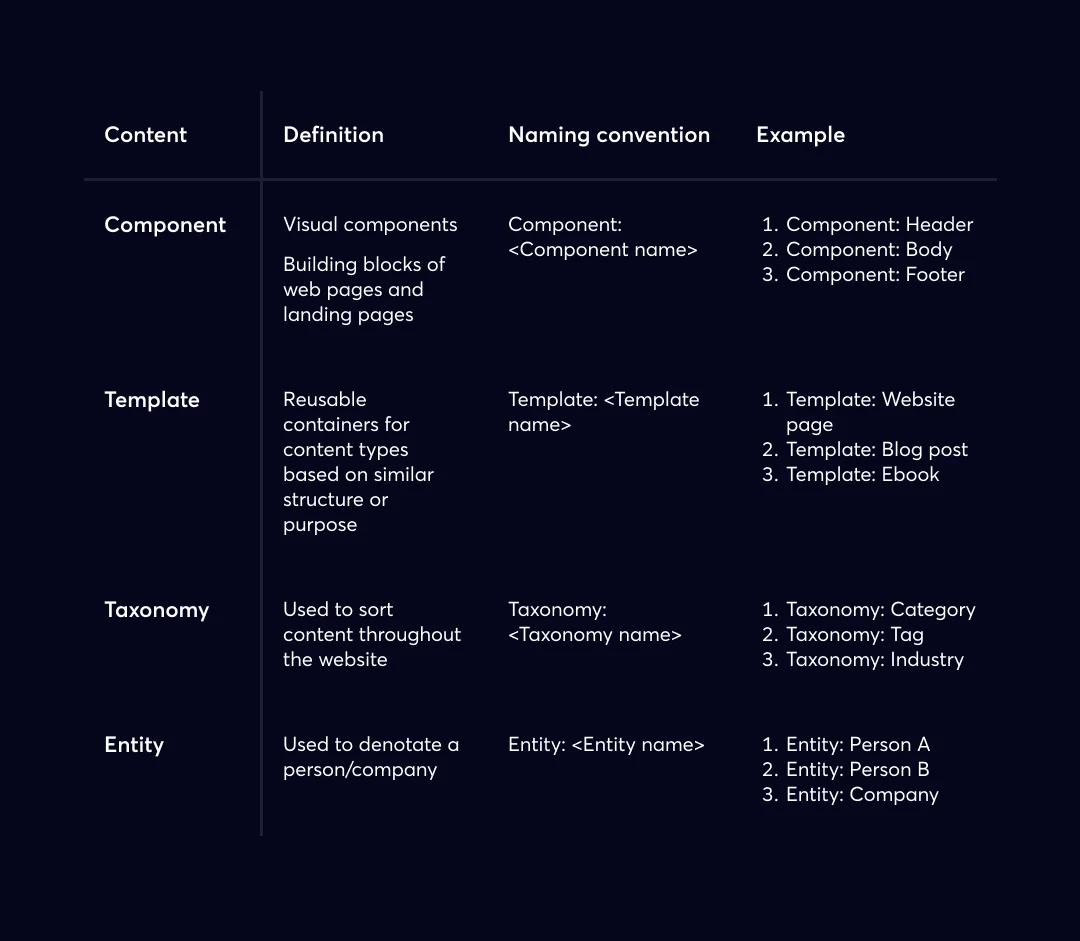
Headless-implementation-4
Teams should share the nomenclature document with content editors as soon as it’s complete!
Building the Content Infrastructure of Your Website
Now for some fun! We’d argue that content modeling is one of the most effective ways to create, optimize, publish, and repolish current and future website pages.
Content modeling makes it easy for content editors and developers to coexist in the headless solution without exhausting development resources. A monolithic CMS could never!
Below is an example of a content model for visual components.
Creating a Content Model for Visual Components
The following provides an example of what a content model for your website component might look like:
Component: Hero
Internal Name: Single-line text
Eyebrow: Single-line text
Heading Size: Dropdown Select | Heading 1, Heading 2, Heading 3, Heading 4, Heading 5, Heading 6
Heading: Single-line
Text Body: Rich-text
Featured Content | Single Reference
Note that the nomenclature follows the naming convention decided above
You have to create a visual component for all your websites’ visual components:
- Create a content model for the header component
- Create a content model for the body component
- Create a content model for the hero component
- Create a content model for the sidebar component
- Create a content model for the scrollbar component
- Create a content model for the footer component
Why is the content structure for SEO metadata important?
Content structure is vital for SEO metadata as it helps gain organic search visibility with the basic keyword matching and link-building efforts.
The following are best practices:
- The slug should be ‘Single line text’
- The Indexable should be ‘Boolean’
- The Meta Description should be ‘Long text’
- OG Image should be an ‘Image’
- Canonical URL should be ‘Single-line text’
- Head HTML should be ‘Long text’
- Footer HTML should be ‘Long text’
Empowering Content Editors with Website Page Content Models
The goal is to allow content editors to build website pages with minimal effort using reusable components. Content editors have the freedom of building drag and drop style pages and have limitless ability to rearrange and test different page variations.
Here are some best practices:
- Include all the fields (that we outlined earlier in our CMS checklist) in your SEO structure content model.
- The internal name should be ‘Single text’
- The components should have many references
We Can Help with Your Headless Implementation
Webstacks is a team of headless experts who know to migrate and implement a new headless CMS. Read about iTrustCapital's WordPress to Contentful migration.

